GameSense fun with Neopixels
by Dave Astels
I like doing fun things with LEDs, especially RGB LEDs (one package incorporating red, green, and blue LEDs close together). By manipulating the brightness of the three LEDs you can mix varying levels of each color to create a large number of colors. The problem is that they can be a real hassle to use. You need 3 PWMs, one to drive each color. If you want to use multiple LEDs it gets even more complex, more PWMs or some sort of multiplexing. This makes it a bit more thought & work to do interesting things.
NeoPixels to the rescue
Some time ago I was browsing on Adafruit and stumbled across a great prototyper’s resource: Neopixels.
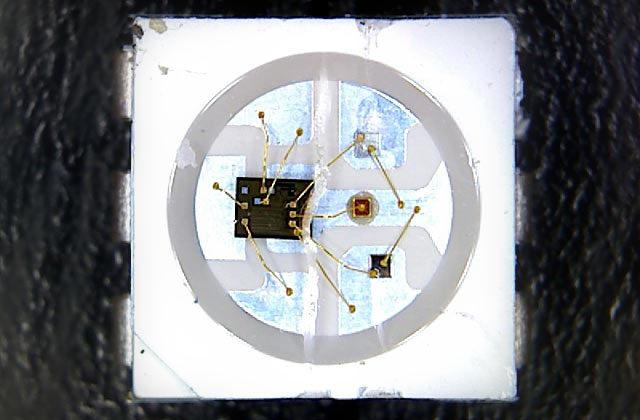
Technically a WS2812 Integrated Light Source, Adafruit calls them NeoPixels and has a complete product line built around them, including sticks, rings, grids, and strips. A NeoPixel contains the red, green, and blue LEDs along with drivers, PWMs, and communication hardware all in a small surface mount package.
Neopixels are impressively bright for their size. If you are using a significant number of them you’ll need more power than you can get over a USB connection. Keep that in mind if you are driving them from a small, USB connected controller. I use an Arduino Uno R3 which has an external 9v supply.
Neopixels have 4 connections on them: power (+5v), ground, data in, and data out. The latter two are the key: NeoPixels are designed to be connected in series in chains up to (depending on the controlling system and power supply) several hundred long.
I was originally using a Trinket to drive a NeoPixel ring. The trouble with a Tinket is that it is incredibly limited. Since those experiments, libraries have become available for Arduino which is what I’m using now (Arduino Uno R3, to be exact).
Sticks
I’ve done some work with NeoPixel rings and more recently sticks, shields, and strips . While the rings are complete as they are (and are available in various sizes (diameter and number of pixels), the sticks each contain 8 NeoPixels and can be chained together.
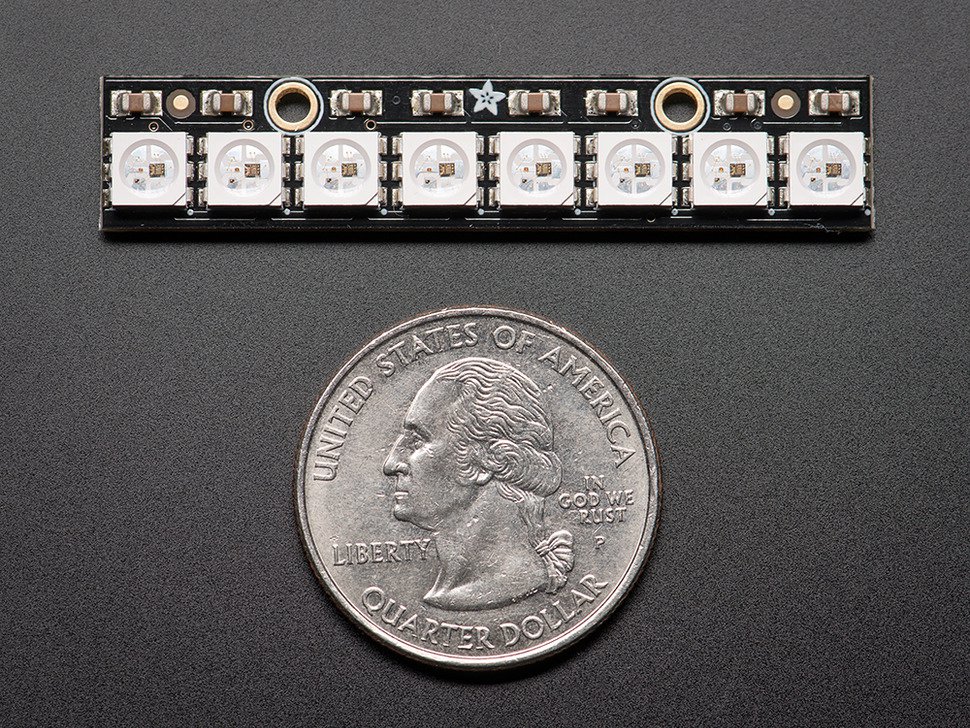
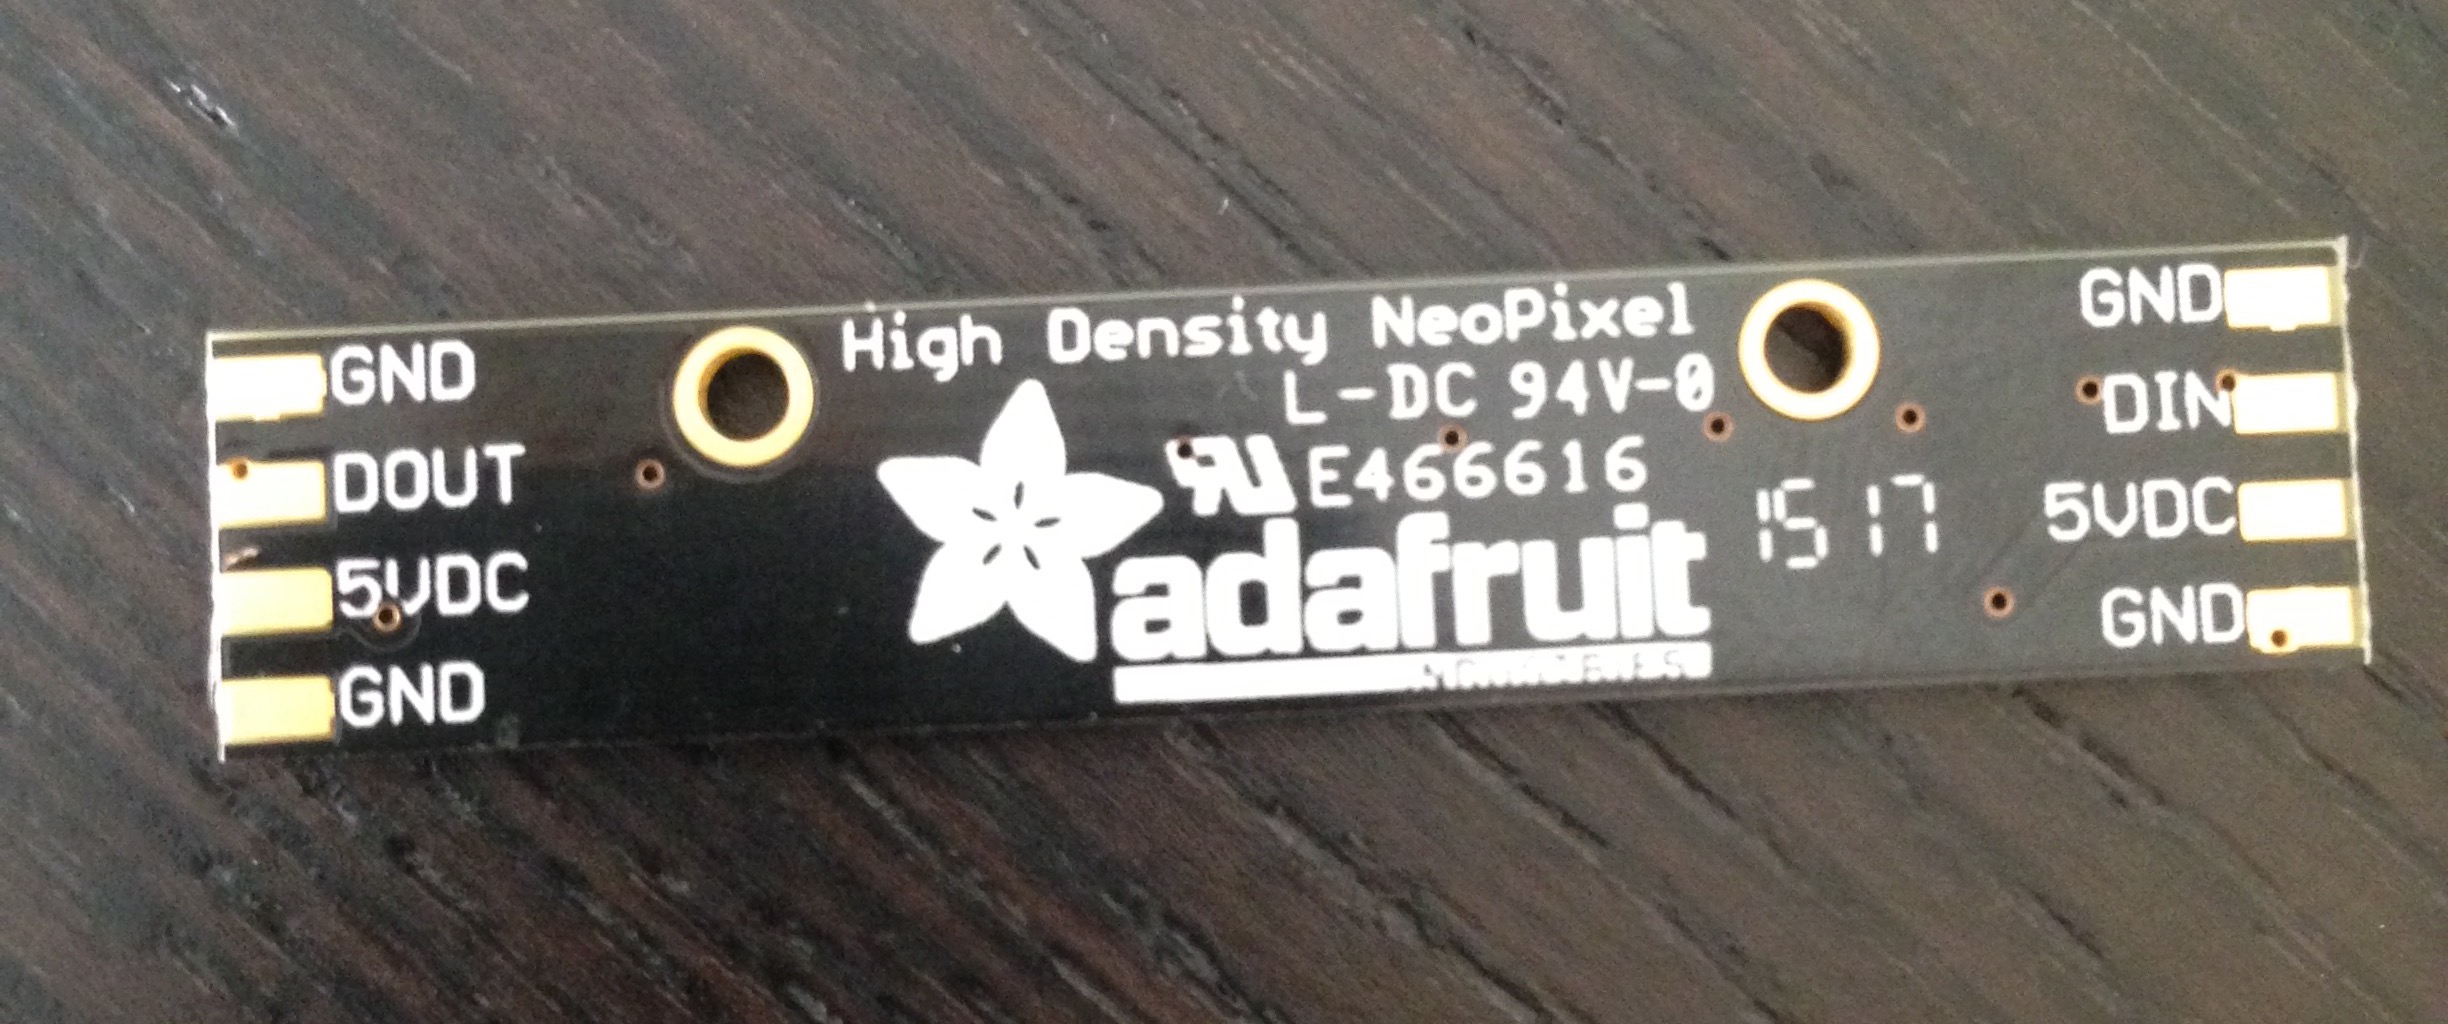
One end has data in, the other has data out. Everything lines up on 0.1” centers so that you can very simply connect the sticks together. I did this using short pieces of header pins. I tinned the stick pads and the header pins. The header lines up perfectly with the pads on the stick so I left them together and soldered them to the pads on one stick. Then I clipped the pins off the header and soldered them to the other stick. This made the process virtually foolproof. Just be sure to snug the sides of the strips against a straight edge when finalizing the soldering to everything is lined up properly and straight.
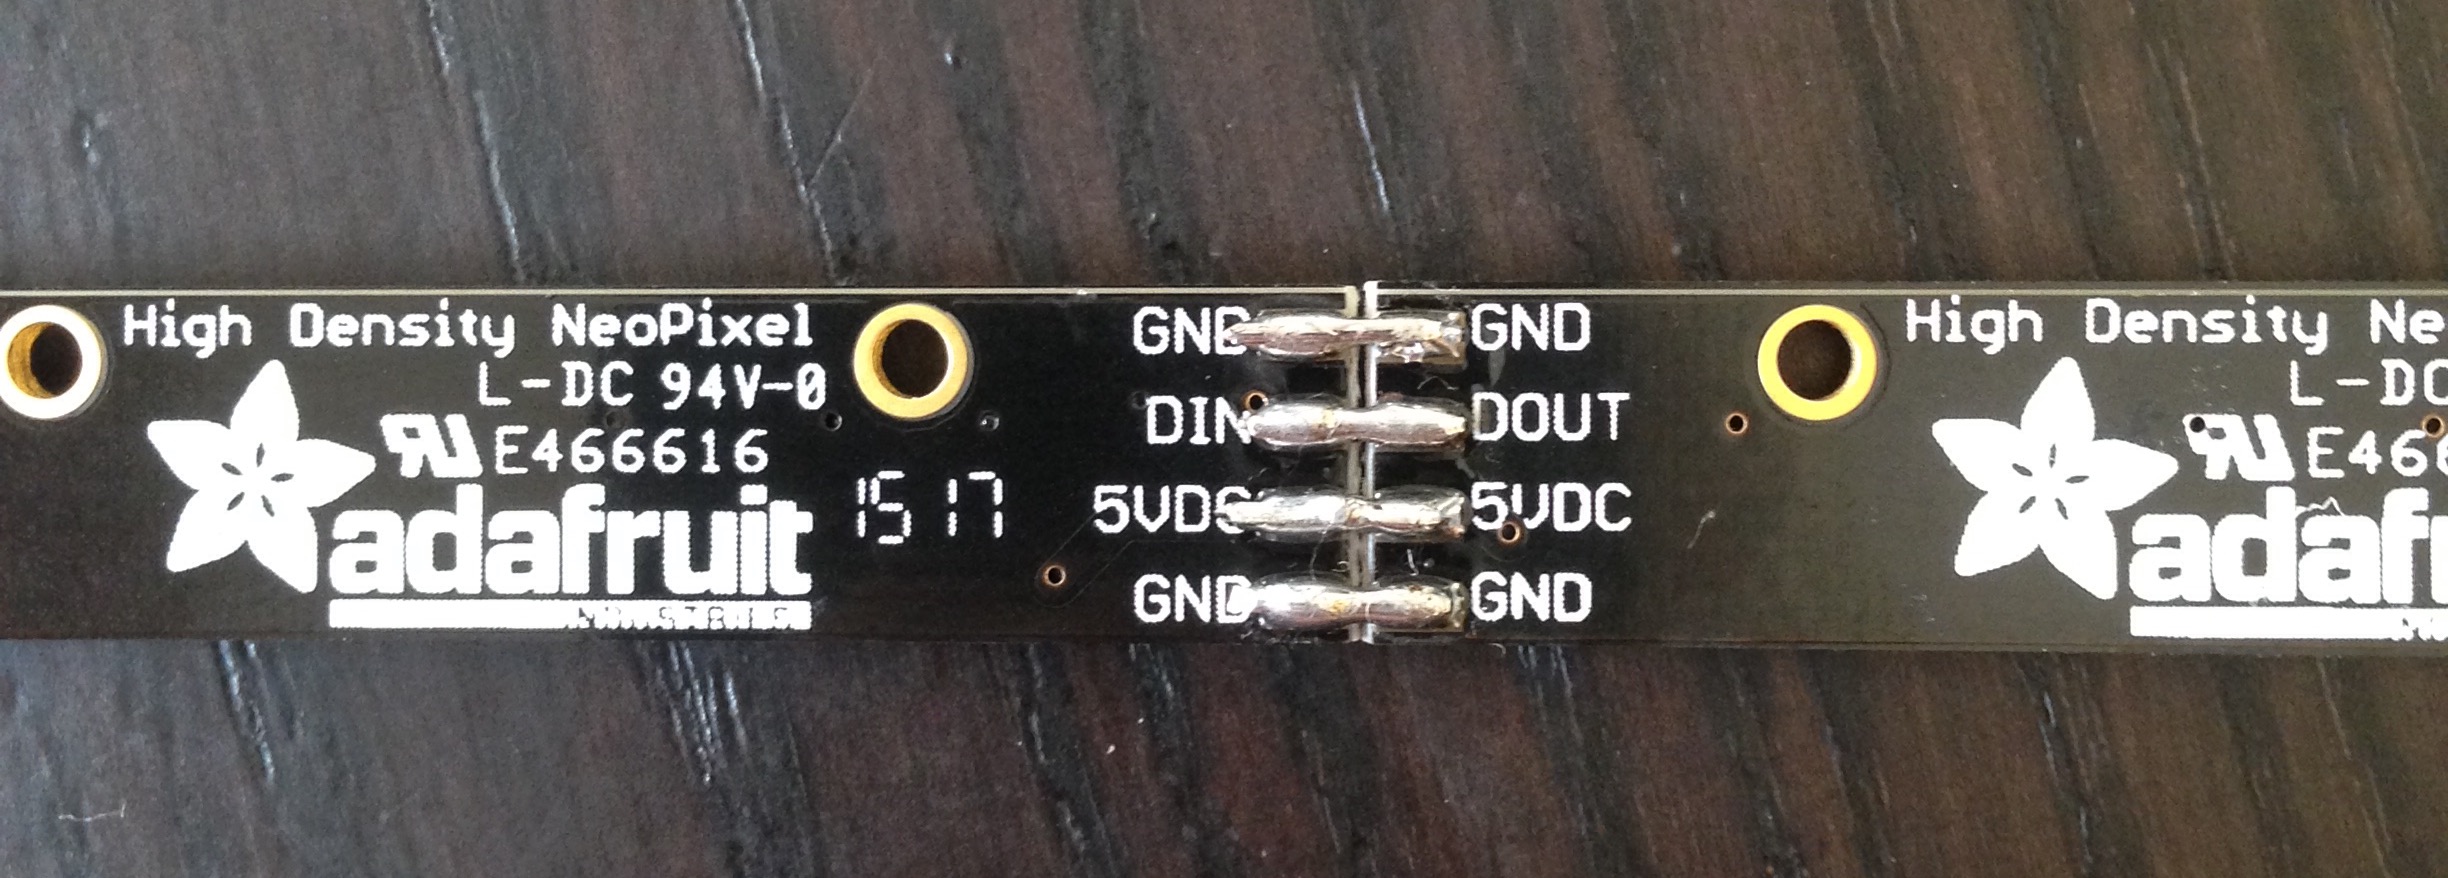
These sticks are designed so that if you butt them together end-to-end all the NeoPixels are the same distance apart, so the assembled stick looks smooth and awesome.
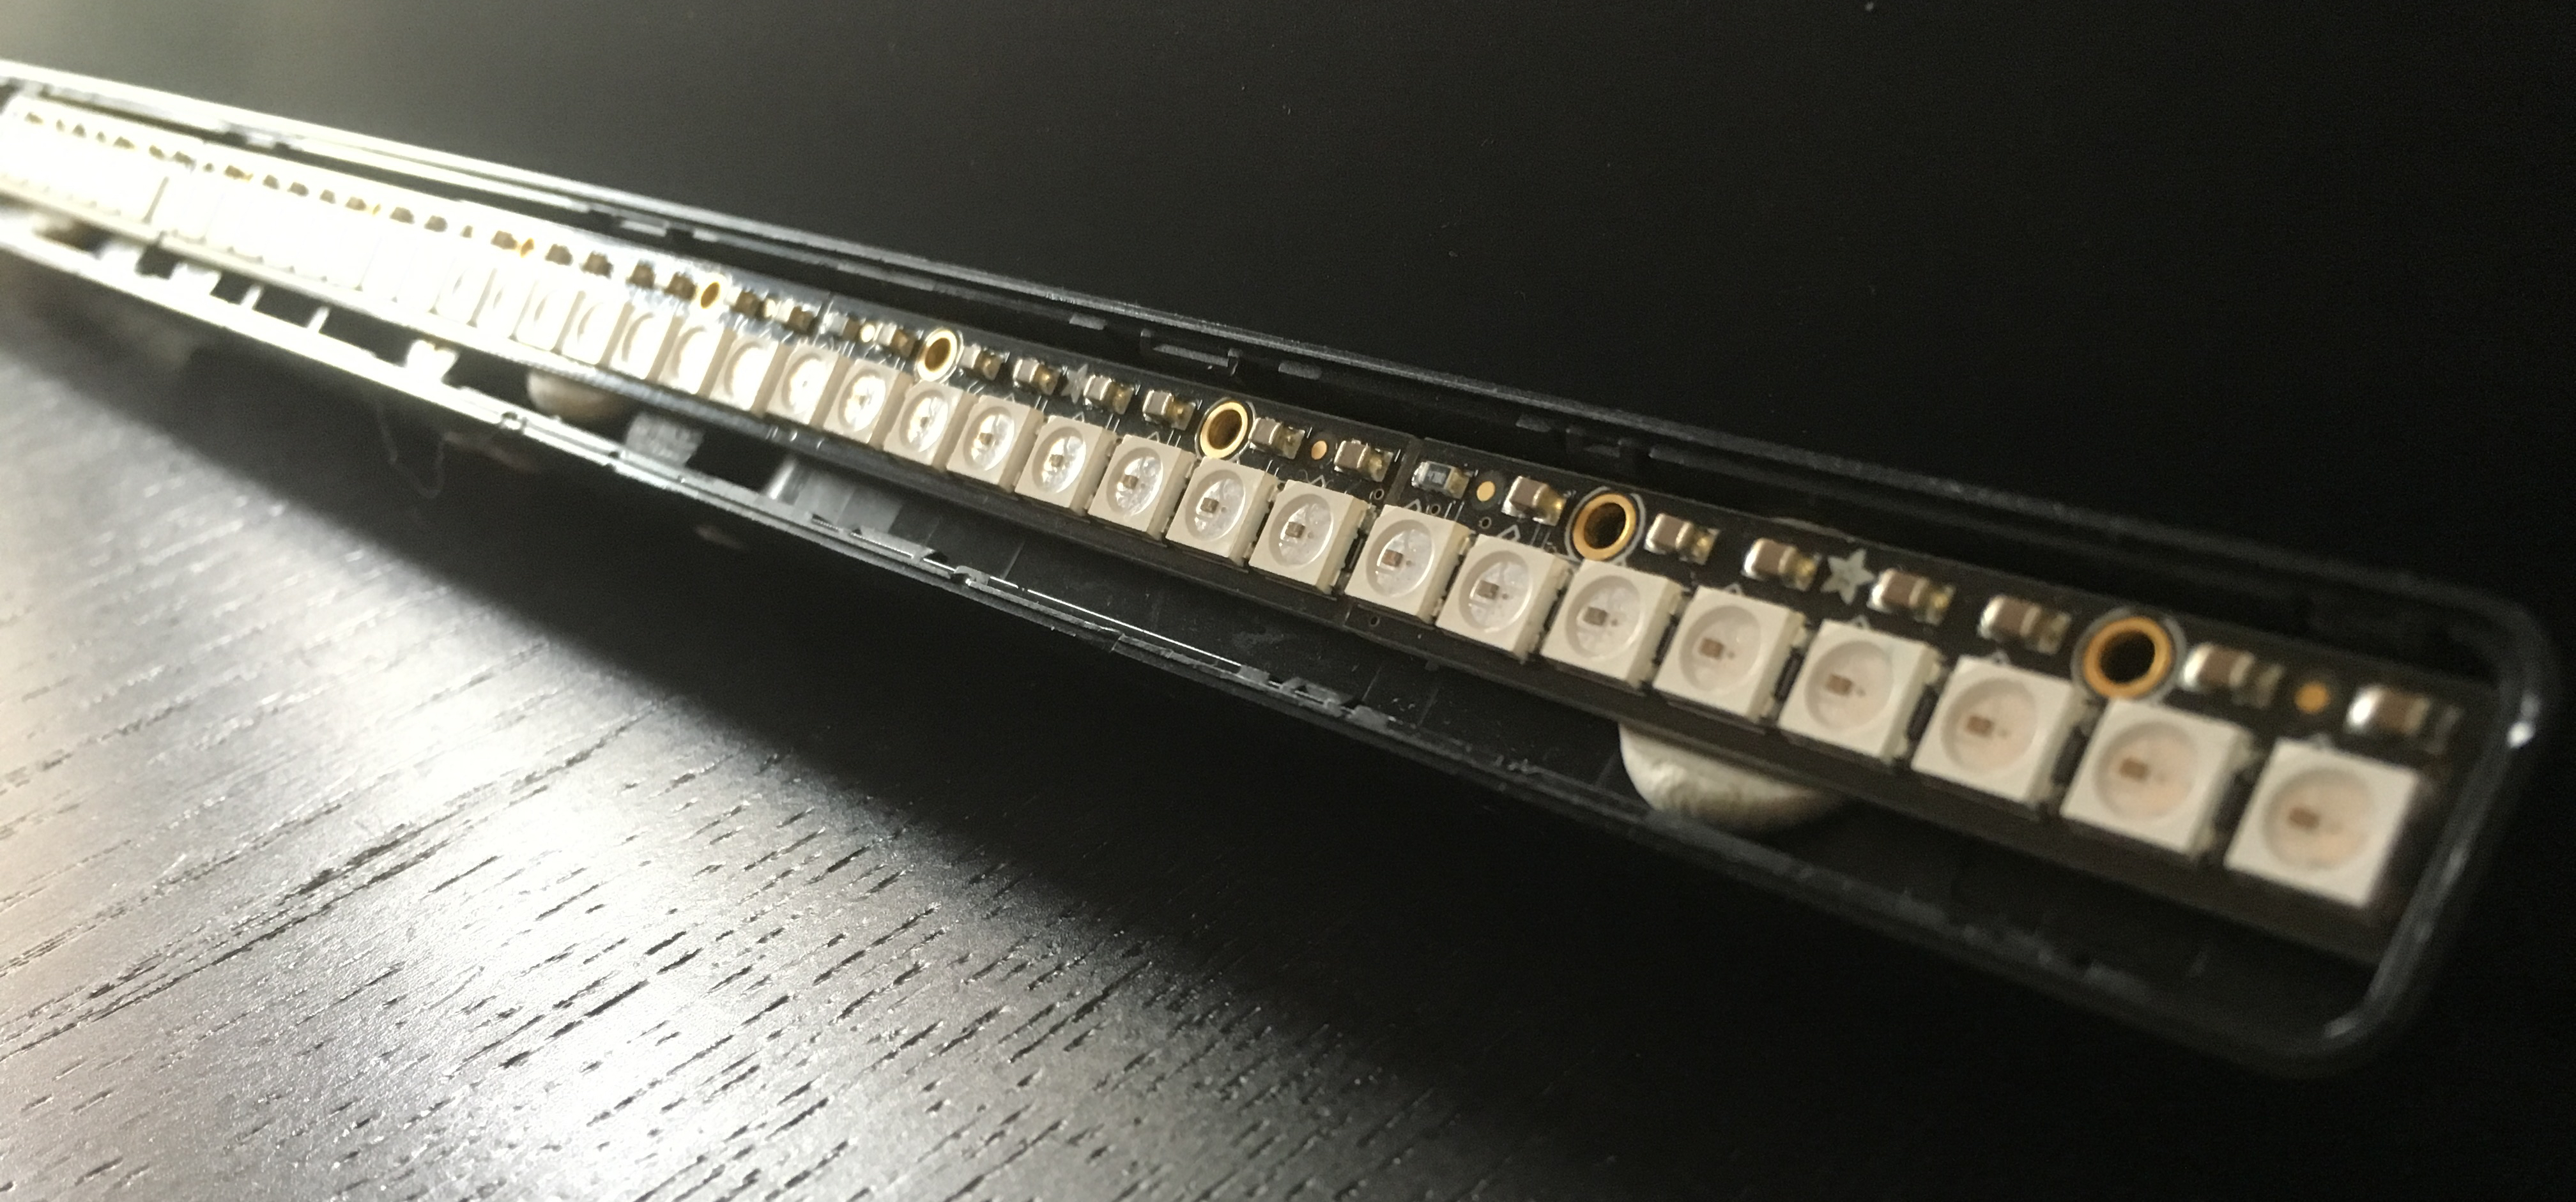
Using this approach you can make a stick of pretty much any length you need (as long as it’s a multiple of eight). I stopped at 40 LEDs. This is nicely dividable into sections of 4, 5, 8, 10, etc. Being a multiple of 10 is especially desirable given my eventual goal of using it as an output device for GameSense.
All that’s left is to attach some wires to the input end of the stick so that we can connect it to the Arduino. With that done, the next step is the driver software.
For a fabulous introduction and guide to NeoPixels see Adafruit’s NeoPixel Uberguide.
Arduino
The software for the Arduino is a modification of the RainbowDuino code I wrote to integrate the Rainbow cube with GameSense. In fact it’s almost identical other than the interface to the NeoPixel library.
#include <Adafruit_NeoPixel.h>

#define PIN 6
#define LEDS 40

Adafruit_NeoPixel strip = Adafruit_NeoPixel(LEDS, PIN, NEO_GRB + NEO_KHZ800);

byte data[256];

void setup() {
  Serial.begin(9600);
  strip.begin();
  strip.show(); // Initialize all pixels to 'off'
}

byte read_byte()
{
  while (Serial.available() == 0);
  return Serial.read();
}

void load_data(byte length)
{
  byte index = 0;
  while (length > 0) {
    data[index++] = read_byte();
    length--;
  }
}

void loop() {
  if (Serial.available() > 0) {
    byte length = read_byte();
    byte command = read_byte();
    length--;
    load_data(length);
    byte i = 0;
    switch (command) {
    case 1:                 /* set the color of specific LEDs */
      while (i < length) {
        strip.setPixelColor(data[i], strip.Color(data[i+1], data[i+2], data[i+3]));
        i += 4;
      }
      strip.show();
      break;
    case 2:                 /* set the colors for all LEDs */
      for (byte i = 0; i < LEDS; i++) {
        strip.setPixelColor(i, strip.Color(data[i], data[i+1], data[i+2]));
        i += 3;
      }
      strip.show();
      break;
    case 3:                 /* clear the stick */
      for (byte i = 0; i < LEDS; i++) {
        strip.setPixelColor(i, strip.Color(0, 0, 0));
      }
      strip.show();
      break;
    }
  }
}
Unrestricting GameSense
Before you can access OS device files in order to communicate with external hardware, GameSense has to be unrestricted. Please see this post for details. You can work with just GoLisp without worrying about this, it is only applicable to using GoLisp in the context of GameSense. That means you can fiddle and prototype all you like in GoLisp, but when you want to access external hardware from GameSense event handlers, you’ll have to unrestrict it first.
GoLisp
The GoLisp for sending commands to the Arduino is also much the same as what I
ended up with for the RainbowDuino Cube shown in the other post. I’ll simply
include the file here. Notice that I changed the way I named things. By prefixing the library name (i.e. neopixel:) it essentially creates a namespace.
;;; -*- mode: Scheme -*-

;;; --------------------------------------------------------------------------------
;;; Ouput to the Neopixel controller
;;; Dave Astels
;;; Steelseries
;;; 2015

(define SET_SOME_LEDS 1)
(define SET_ALL_LEDS 2)
(define CLEAR 3)

(define neopixel:led-count 0)

(define neopixel:port nil)

(define (neopixel:open-port port-name count)
  (unless neopixel:port
          (set! neopixel:led-count count)
          (set! neopixel:port (open-output-file port-name))))


;;; close the connection to the arduino

(define (neopixel:close-port)
  (when neopixel:port
        (close-port neopixel:port)
        (set! neopixel:port nil)))


;;; Write to the Rainbowduino

(define (neopixel:write cmd)
  (let ((bytes (cons (length cmd) cmd)))
    (write-bytes (list->bytearray bytes) neopixel:port)))


;;; set the color of a single LED
;;; position is i
;;; color is (r g b)

(define (neopixel:set-one position color)
  (neopixel:write (flatten (list SET_SOME_LEDS position color))))

;;; Set the colors of specific LEDs
;;; positions-and-colors is ( (i (r g b)) ... )

(define (neopixel:set-some positions-and-colors)
  (neopixel:write (flatten* (list SET_SOME_LEDS positions-and-colors))))


;;; set the color of all LEDs
;;; colors is ( (r g b) ... ), one tuple for each of the LEDs

(define (neopixel:set-all colors)
  (let ((cmd (flatten* (list SET_ALL_LEDS colors))))
    (neopixel:write cmd)))


;;; Clear the neopixels

(define (neopixel:clear-all)
  (neopixel:write (list CLEAR)))
Zone management
Since a 40 LED stick provides makes it compelling to split it into multiple logical zones (e.g. one the show health, one to show ammo, etc) the control code had to be more complex. As I mentioned in my post on the RainbowCube, the above code provides very basic commands to set the color of specific LEDs. I also mentioned that this provides a good foundation on which to build more abstract facilities. In this project I’ll be doing just that.
I’ll work through it one section at a time, followed by the entire file (for ease of copying).
To start with, I want to be able to split the 40 LED stick into logical zones which I can use for indicating different things. Zones are stored in a frame, the zone number (converted into a symbolic slot name) is used as the slot name and the value is the indexes of the LEDs that make up the zone.
The functions provide a way to create/replace a zone given the first LED (from 0) and the size of the zone, as well as a way to retrieve the LEDs in a specific zone.
(define nps:zones {})

(define (nps:index->slotname i)
    (intern (str i ":")))

(define (nps:set-zone! zone-number start size direction)
  (let ((slot-name (nps:index->slotname zone-number))
        (leds (if (eq? direction increasing:)
                  (interval start (+ start (pred size)))
                  (interval start (- start (pred size)) -1))))
    (set-slot! nps:zones slot-name leds)))

(define (nps:get-zone zone-number)
    (get-slot-or-nil nps:zones (nps:index->slotname zone-number)))
The set-zone! function takes the first LED index in the zone, the number of
LEDs in the zone, and whether to order them in increasing or decreasing order.
Zone coloring
Here I have a few utility functions to color the LEDs in a zone.
First, a low level functions to set the colors of LEDs. This uses the neopixel:set-some function in the neopixel library to send the appropriate commands to the Arduino.
(define (nps:show-on-leds leds colors)
  (when (> (length leds) 0)
        (neopixel:set-some (map list leds colors))))
Sometimes it’s useful to fill a zone with a solid color, so there’s a function for that:
(define (nps:show-single-color-on-leds leds color)
  (neopixel:set-some (map (lambda (led)
                            (list led color))
                            leds)))
Next is the same functionality, but using a zone rather than lists of LEDs. This uses the previous function to do the actual coloring.
(define (nps:show-colors-on-zone colors zone-number)
  (let ((zone (nps:index->slotname zone-number)))
    (when (has-slot? nps:zones zone)
          (nps:show-on-leds (get-slot nps:zones zone) colors))))
Now things get more interesting with a function that takes a color, a percentage (0-100), and a zone. It computes the color of each LED in the zone so as to show a bar graph in the zone. The rightmost LED has it’s brightness set to indicate the portion of it lit since each LED represents more than a single percent.
This works by figuring out how many percent each LED represents, then computing how many LEDs need to be on, and how bright the final one should be. Then it sets the color of the LEDs in the zone.
(define  (nps:show-percent-on-zone zone-color percent zone)
  (when (has-slot? nps:zones (nps:index->slotname zone))
        (let* ((leds (get-slot nps:zones (nps:index->slotname zone)))
               (num-leds (length leds))
               (per-led (/ 100.0 num-leds))
               (num-lit (cond ((<= percent 0) 0)
                              ((<= percent per-led) 1)
                              (else (min (list num-leds
                                               (integer (* (/ (+ per-led percent)
                                                              100.0)
                                                           num-leds)))))))
               (remainder (- percent (* per-led (max (list (pred num-lit) 0)))))
               (scale (min (list (integer (/ (* 100 remainder) per-led))
                                             100)))
               (final-color (map (lambda (color-bit)
                                   (integer (/ (* scale color-bit)
                                               100)))
                                 zone-color))
               (led-colors (map (lambda (led-index)
                                  (cond ((< led-index (pred num-lit)) zone-color)
                                        ((== led-index (pred num-lit)) final-color)
                                        (else black-color)))
                                (interval 0 (pred num-leds)))))
          (nps:show-on-leds leds led-colors))))
CS:GO
Now that I have all the code written to control a stick of 40 NeoPixels split into arbitrary zones, I need to hook it up to CS:GO via GameSense.
I’ll take 15 LEDs (0-14) for a health % bar-graph, 15 (15-29) for an ammo % (i.e. how full is your clip) bar-graph, and 5 (39-35) for a kill/headshot count.
The code to set these up is simple thanks to the zone management functions I wrote:
(neopixel:open-port "/dev/cu.usbmodem1411" 40)
(neopixel:clear-all)
(nps:set-zone! 1 0 15increasing:)
(nps:set-zone! 2 15 15 increasing:)
(nps:set-zone! 3 35 5 decreasing:)
The health and ammo handlers are simple. I’ll use a flasher to flash when they’re low so it’s just a matter of sending the percent health/full values to the right flasher (which I’ll define below):
(handler "UPDATE-HEALTH"
         (lambda (data)
           (set-value:> csgo-health-flasher-with-neopixel (value: data))))


(handler "UPDATE-AMMO"
         (lambda (data)
           (set-value:> csgo-ammo-flasher-with-neopixel (value: data))))
The health flasher is fairly simple, as it uses the built-in color computation of
the Flasher. This will flash the health display at 2Hz when health drops below
13%. Why 13%? Using 15 LEDs to cover 100% gives 6.666% each, two LEDs is about
13%. So this will flash when health is down to two LEDs worth, i.e. 13%.
(define csgo-health-flasher-with-neopixel {
   proto*: Flasher
   auto-enable: #t
   zero-color: red-color
   hundred-color: green-color

   compute-period: (lambda (percent-full)
                     (if (and (not (nil? percent-full))
                              (> percent-full 0)
                              (<= percent-full 13))
                         250
                         0))

   update-color: (lambda (c percent-full)
                   (nps:show-percent-on-zone c percent-full 1))

   cleanup-function: (lambda (v)
                       (update-color color value))})
The ammo flasher works a little differently. I am supplying a custom
compute-color: function. Instead of gradually changing from one color to
another based on the value, in this case I want it to transition from blue, to
orange, to red as ammo gets used (i.e. the amount remaining in the clip is
reduced). I am also providing a compute-period: function to flash if the level
is below 20%.
(define csgo-ammo-flasher-with-neopixel {
   proto*: Flasher
   auto-enable: #t

   compute-color: (lambda (percent-full)
                    (cond ((nil? percent-full) black-color)
                          ((< percent-full 20) red-color)
                          ((< percent-full 34) orange-color)
                          (else blue-color)))

   compute-period: (lambda (percent-full)
                     (if (and (not (nil? percent-full))
                              (> percent-full 0)
                              (<= percent-full 20))
                         250
                         0))

   update-color: (lambda (c percent-full)
                   (nps:show-percent-on-zone c percent-full 2))

   cleanup-function: (lambda (v)
                       (update-color color value))})
The kill-count handler is quite different. It’s not a percentage, it’s a count. Further I want to overlay headshot counts as well. I’m designing this for a standard 5v5 game, so I’ll take five LEDS for the zone (as shown above) to represent the five possible kills. I want the LEDS to light up as I get kills, white for a regular kill, and red for a headshot. I’m just interested in the tally, not the order so that makes it easier. I’m using the update event that includes the additional headshot count.
The handler computes the number of headshots, non-headshots, and nothings (with some validation). It then makes lists of appropriate lengths for each color (red, white, and black/off), appends them together, and uses the result to set the LEDs in the zone.
Here’s the handler.
(handler "UPDATE-ROUND_KILLS_HEADSHOTS_COMBO"
         (lambda (data)
           (let* ((kills (value: data))
                 (headshots (min (list
                              5
                              kills
                              (if (round_killhs:? (state: (player: (frame: data))))
                                (round_killhs: (state: (player: (frame: data))))
                                0))))
                 (non-headshots (min (list (- 5 headshots) (- kills headshots))))
                 (no-hits (max (list 0 (- 5 kills))))
                 (colors (append (make-list headshots red-color)
                                 (make-list non-headshots white-color)
                                 (make-list no-hits black-color))))
             (nps:show-colors-on-zone colors 3))))
Summary and further work
NeoPixels are very easy to work with, given you have the right controller (one with a NeoPixel library) and can supply adequate power. Adafruit has them packaged in a variety of formats that can work immediately with projects. The controller code is simple, as is driving them from GameSense. GoLisp lets you layer on whatever abstraction as appropriate for your project.
Since finishing this project I’ve built a second strip of 40, and hooked both to a Teensy 3.1 which has a very advanced NeoPixel library. I’ll write that up someday soon.